Motivation for this project
Every time I add a new device (IOT, server or other) to my home network, I want to make sure that I can rely on it to do its job and keep being connected.
When a device has a critical part to play in my home or office, I want to be alerted when it fails or if it disconnects from the network/internet.
A critical part may be my home router, a computer connected to the internet and acts as a server (web, ftp) or IOT device like a gas sensor.
The project
The solution for me was a centralized system that each device sends updates to, and if a device fails to send an update (a heartbeat), I’ll get notified by mail.
What I used for this project
- Web hosting/server -when we want to get notified when something in our network fails, we cant rely on anything inside our network, we need an external tool that will be able to monitor and act in the case of a malfunction. So the most important tool is an external server, for this project I’m using a PHP web hosting, which is rather cheap, and there are even some free out there. Preferably – the hosting your choose includes a database – MySql, otherwise, you’ll need to work with files, which is not recommended.
- A script/code for each of the devices that I want to keep track on, depending on the system (Windows, Arduino, DD-WRT). This part is in charge of sending the heartbeat and letting our server know that the device is alive and well.
- If you want to do or use parts of this article, you’ll need a basic understanding of code and how the Internet works. this article is not for beginners, but beginners can learn from it.
The server/web hosting part
Database
First, I created a table in the database, which I’ll use to update heartbeats for each device and configure whether to send an email and where to if something fails.
The table should look something like this:
| deviceID | deviceName | deviceDescription | lastIpAddress | lastSeen | sendMailOnError | sentMail | emailonError | notes |
| 1 | FtpServer | Home Ftp Server | 192.168.1.85 | 2017-12-02 16:15:40 | True | False | alert@mail.com | |
| 2 | GasSensor1 | Kitchen Gas Sensor | 192.168.1.86 | 2017-12-02 16:15:48 | True | False | gas@mail.com | |
| 3 | HomeRouter | Main Router | 212.150.22.68 | 2017-12-02 16:15:48 | True | False | alert@mail.com |
Description of the table: First of all, we have the field deviceID, which is the key for the table. Then deviceName & deviceDescription let’s see clearly to which device this row belongs to.
lastIpAddress is for us to know which internal network address each device got, which is very useful when you don’t have a fixed address set up for devices.
lastSeen is used to indicate the last heartbeat the server got from each device, we’ll use this field later to determine whether this device has failed.
sendMailOnError is a boolean field in which we indicate if a mail is needed if the device didn’t send a heartbeat in the needed timeframe.
Next, we have the sentMail field, which is used to indicated that an alert has already been sent out, and we don’t need to send another.
The code for the MySql table:
|
1 2 3 4 5 6 7 8 9 10 11 12 |
CREATE TABLE IF NOT EXISTS `deviceStatus` ( `deviceID` int(11) NOT NULL AUTO_INCREMENT, `deviceName` varchar(45) COLLATE utf8_bin DEFAULT ' ', `deviceDescription` varchar(45) COLLATE utf8_bin DEFAULT ' ', `lastIpAddress` varchar(45) COLLATE utf8_bin DEFAULT ' ', `lastSeen` datetime DEFAULT NULL, `sendMailOnError` int(11) DEFAULT '0', `sentMail` int(11) DEFAULT '0', `emailOnError` varchar(45) COLLATE utf8_bin DEFAULT ' ', `notes` varchar(200) COLLATE utf8_bin DEFAULT ' ', PRIMARY KEY (`deviceID`) ) ENGINE=InnoDB DEFAULT CHARSET=utf8 COLLATE=utf8_bin AUTO_INCREMENT=9 ; |
PHP Script for heartbeats
After we have our table built and ready, we need to have a PHP script which can fill and update it.
This script and table are very generic, and of course, you can fit it to your requirements and needs. Let’s name this file heartbeat.php
|
1 2 3 4 5 6 7 8 9 10 11 12 13 14 15 16 17 18 19 20 21 22 23 24 25 26 27 28 29 30 31 32 33 34 35 36 37 38 39 40 41 42 43 44 45 46 47 48 49 50 51 52 |
<?php $timezoneConst = 300 ; // in minutes - used to insert the times correctly // Get All Parameters from link $deviceName = isset($_GET['deviceName']) ? $_GET['deviceName'] : '' ; $deviceDescription = isset($_GET['deviceDescription']) ? $_GET['deviceDescription'] : '' ; $lastIpAddress = isset($_GET['lastIpAddress']) ? trim($_GET['lastIpAddress']) : '' ; $sendMailOnError = isset($_GET['sendMailOnError']) ? $_GET['sendMailOnError'] : '' ; $emailOnError = isset($_GET['emailOnError']) ? $_GET['emailOnError'] : '' ; $notes = isset($_GET['notes']) ? $_GET['notes'] : '' ; // Setup the database connection $hostname="localhost"; $username="YOUR-USER-NAME"; $password="YOUR-PASSWORD"; $dbname="YOUR DATABASE NAME"; $conn = new mysqli($hostname, $username, $password, $dbname); // check if device already exists $sql = "SELECT deviceID FROM MyProjectsDBwm.deviceStatus where deviceName = '$deviceName'"; $result = $conn->query($sql); $deviceID = 0 ; if ($result->num_rows > 0) { while($row = $result->fetch_assoc()) { $deviceID = $row['deviceID'] ; break ; } } else { $deviceID = 0 ; } if ($deviceID != 0) { // The device is already in our database - update $sql = "update MyProjectsDBwm.deviceStatus set lastSeen= DATE_ADD(CURRENT_TIME(), INTERVAL $timezoneConst MINUTE) " . ($deviceDescription != '' ? ", deviceDescription = '$deviceDescription' " : ' ') . ($lastIpAddress != '' ? ", lastIpAddress = '$lastIpAddress' " : ' ') . ($sendMailOnError != '' ? ", sendMailOnError = '$sendMailOnError' " : ' ') . ($emailOnError != '' ? ", emailOnError = '$emailOnError' " : ' ') . ($notes != '' ? ", notes = '$notes' " : ' ') . " where deviceID = $deviceID;"; } else { // a new device has been recognized - insert $sql = "insert into MyProjectsDBwm.deviceStatus (deviceName, deviceDescription, lastIpAddress,sendMailOnError,emailOnError,notes,lastSeen) values ('$deviceName', '$deviceDescription', '$lastIpAddress', '$sendMailOnError','$emailOnError','$notes', DATE_ADD(CURRENT_TIME(), INTERVAL $timezoneConst MINUTE))"; } if ($conn->query($sql) === TRUE) { echo "success"; } else { echo "Error: " . $sql . "<br>" . $conn->error; } ?> |
The device’s part – sending the heartbeats
Basically, what we need is to get each device to send a heartbeat every X minutes (in my case I wanted 5).
On every type of device, it’s done a little differently.
Here I’ll show how to do it for Windows, DD-WRT (or cron capable) running router and Arduino (with network capability, like ESP8266).
Microsoft Windows – Most versions are supported
The idea is to write a batch file which opens the link and then run it in Task Scheduler. This script to reach our PHP code over the Internet, pass it some parameters (for example the internal IP address of the network) and sends the heartbeat. For this to work, you need to upload the PHP script to the hosted server and point this script to its address, for example http://yourserver/heartbeat.php
Save the script below as sendheartbeat.bat:
|
1 2 3 4 5 6 7 8 9 10 11 12 13 14 15 16 17 18 19 20 21 22 23 24 25 26 |
@set @x=0 / * :: ChkHTTP.cmd @echo off setlocal enabledelayedexpansion set ip_address_string="IPv4 Address" for /f "usebackq tokens=2 delims=:" %%f in (`ipconfig ^| findstr /c:%ip_address_string%`) do ( set ip=%%f echo !ip! ) for /f "tokens=* delims= " %%a in ("%ip%") do set ip=%%a for /l %%a in (1,1,100) do if "!ip:~-1!"==" " set ip=!ip:~0,-1! set "URL=http://yourserver/heartbeat.php?deviceName=HomeServer2^&lastIpAddress=%ip%" echo %url% cscript /nologo /e:jscript "%~f0" %URL% | find "200" if %ErrorLevel% EQU 0 ( echo OK ) else ( echo Error ) goto :EOF JScript * / var r=new ActiveXObject("Microsoft.XMLHTTP"); r.open("GET",WSH.Arguments(0));r.send(); while (r.ReadyState!=4) {WSH.Sleep(100)}; WSH.Echo(r.status) |
Please note that we’re requesting http://yourserver/heartbeat.php – you need to point this to where ever you host this file
add a scheduled task for it to execute every 5 minutes:

Windows Task Scheduler
Arduino devices and home automation, like ESP8266
Same here, the idea is to create a function that runs every 5 minutes, that sends the heartbeat. We can even implement it in a non-blocking way.
The code below is a part of a sketch in the Arduino IDE
|
1 2 3 4 5 6 7 8 9 10 11 12 13 14 15 16 17 18 19 20 21 22 23 24 25 26 27 28 29 30 31 32 |
#include <ESP8266HTTPClient.h> unsigned long previousMillisHB = 0; const long intervalHB = 5; void heartbeat (){ HTTPClient http2; IPAddress myIP = WiFi.localIP(); String strIP = String(myIP[0])+"."+String(myIP[1])+"."+String(myIP[2])+"."+String(myIP[3]); // get the ip address http2.begin("http://yourserver/heartbeat.php?deviceName=gasSensor1&lastIpAddress=" + strIP); //HTTP digitalWrite ( led, 1 ); int httpCode = http2.GET(); Serial.print("Staring request\n"); if(httpCode > 0) { if(httpCode == HTTP_CODE_OK) { Serial.println("Success hb"); } } else { Serial.printf("Fault in hb: %s\n", http2.errorToString(httpCode).c_str()); } http2.end(); digitalWrite ( led, 0 ); } void loop() { unsigned long currentMillis = millis(); if (currentMillis - previousMillisHB >= intervalHB * 1000) { previousMillisHB = currentMillis; if (isConnected == 2){ Serial.println("hb"); heartbeat(); } } } |
Here we have two sections, first the function that sends the heartbeat, and the loop function that is in charge of executing every 5 minutes, in the non-blocking way of course. In this code I also wanted the built-in led of the ESP8266 to blink, so I added to the beginning and the end of the heartbeat function the digitalWrite method.
DD-WRT (or a cron capable) Router
The router might just be the most important component of your network, if it fails (ISP, blackout etc.), nothing else can be controlled or monitored from outside.
DD-WRT routers usually have the option to run a script at a schedule, also known as Cron-jobs (we’ll talk about cron jobs in the next section as well), on my router the cron section can be found on Administration -> Management -> Cron on the router’s interface. Make sure it’s enabled. There enter this line of code:
|
1 |
*/5 * * * * root wget -qO - http://yourserver/heartbeat.php?deviceName=Router |
Click on apply, and from then on, every 5 minutes, your router will send a heartbeat to your server.
Monitoring the health of the devices and send alerts when necessary
A PHP script to check that all devices have “checked-in”. The script below is checking that all devices have sent a heartbeat and sends a mail message about the ones that have not and are marked with send mail. It also checks that the mail hasn’t already been sent to prevent flooding. Save this script on the server and call it checkHeartBeat.php
|
1 2 3 4 5 6 7 8 9 10 11 12 13 14 15 16 17 18 19 20 21 22 23 24 25 26 |
<?php $timezoneConst = 300 ; // in minutes - used to insert the times correctly // Setup the database connection $hostname="localhost"; $username="YOUR-USER-NAME"; $password="YOUR-PASSWORD"; $dbname="YOUR DATABASE NAME"; $emailsent = 0 ; $conn = new mysqli($hostname, $username, $password, $dbname); // check if there are devices that didnt send a heartbeat $sql = "SELECT deviceName, emailOnError FROM MyProjectsDBwm.deviceStatus where sendMailOnError = 1 and sentMail = 0 and lastSeen < DATE_ADD(CURRENT_TIME(), INTERVAL $timezoneConst MINUTE) + 15 "; $result = $conn->query($sql); if ($result->num_rows > 0) { while($row = $result->fetch_assoc()) { $deviceName = $row['deviceName'] ; $emailOnError = $row['emailOnError']; if ($emailOnError != '' ){ mail($emailOnError, "$deviceName is DOWN", "Please note $deviceName didn't send a heartbeat and is not reachable"); } } } else { echo "All OK" ; } ?> |
The last and final step of this project is to run this script on the server every 5 minutes, that too we can do using the cron job functionality. In the cron job section of your hosting (I’m using a CPANEL hosting on Linux) do something like this:
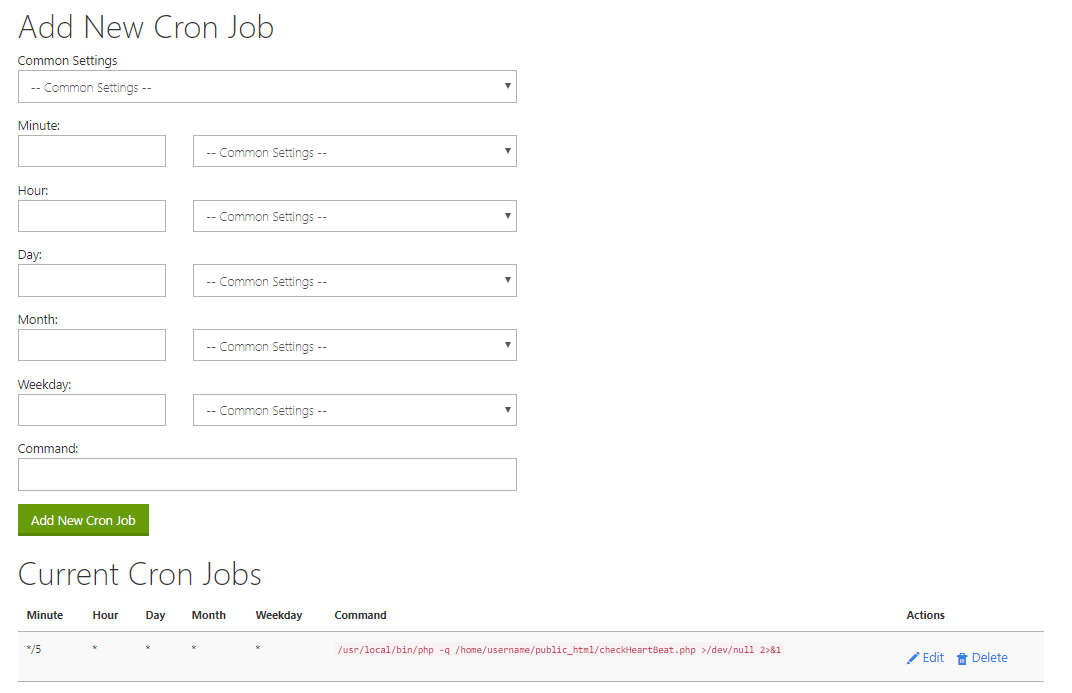
cron job on CPANEL hosting
Conclusion
Well, here I covered the basics of tracking and monitoring devices on the network, which is mainly useful for devices that have some importance, like sensors, servers and so on. The idea is basically the same for all devices, send a heartbeat every X minutes, and if a device fails to do so, send a mail telling us about it.
I hope you enjoy this project!
Pingback: Make your own smart gas sensor with MQ2 and ESP8266 WiFi Arudino | Roei's Tips Stream