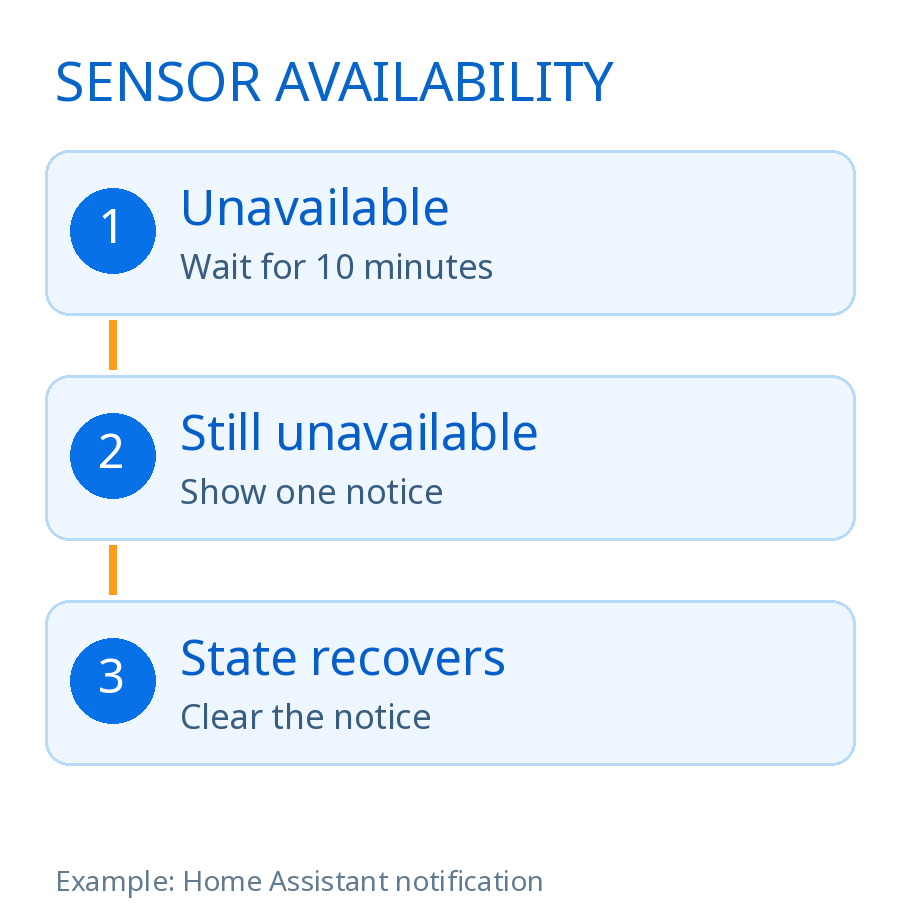
A freezer temperature sensor is only helpful if you know when it stops reporting. When a sensor loses its connection, Home Assistant may show unavailable or unknown. This guide builds a monitor for one entity: after a sustained outage it shows one notice in Home Assistant, and removes that notice when the entity reports a usable state again.
The monitor checks every minute as well as on state changes and startup. A 10-minute wait filters brief interruptions. The notice is in Home Assistant’s Notifications panel; this example does not send a phone push.
What you need
- Home Assistant Core 2026.11.0 or later, on any installation type, with access to the automation editor. The example follows the 2026.11 documentation.
- One existing entity whose integration actually reports
unavailableorunknownduring the failure you want to monitor. Find its entity ID under Settings → Devices & services → Entities. - Permission to create automations and read Home Assistant notifications. No extra integration or hardware is required.
This is a status monitor, not a safety alarm: it cannot notify you while Home Assistant itself is stopped. It cannot detect a frozen sensor that keeps displaying an old normal value. An absent or misspelled entity is not reliably reported; verify the entity exists first.
1. Create the automation
- Go to Settings → Automations & scenes → Automations → Create automation → Create new automation.
- Open the editor’s menu and choose Edit in YAML. Replace its contents with the complete example below.
- Replace
sensor.example_temperaturein all four places with your entity ID. The last occurrence is explanatory message text; keeping it accurate helps identify the problem. Keep the twonotification_idvalues identical. - Save and make sure the automation is enabled.
|
1 2 3 4 5 6 7 8 9 10 11 12 13 14 15 16 17 18 19 20 21 22 23 24 25 26 27 28 29 30 31 32 33 34 35 36 37 38 39 40 |
alias: Watch important sensor availability mode: single triggers: - trigger: time_pattern minutes: "/1" - trigger: state entity_id: sensor.example_temperature to: null - trigger: homeassistant event: start actions: - choose: - conditions: - condition: state entity_id: sensor.example_temperature state: - unavailable - unknown for: "00:10:00" sequence: - action: persistent_notification.create data: notification_id: important_sensor_offline title: Important sensor needs attention message: >- sensor.example_temperature has reported unknown or unavailable for at least 10 minutes. Check its integration and device. - conditions: - condition: not conditions: - condition: state entity_id: sensor.example_temperature state: - unavailable - unknown sequence: - action: persistent_notification.dismiss data: notification_id: important_sensor_offline |
2. Understand the timing
Why check on a schedule as well as on state changes? A state change lets the notice clear promptly when the sensor recovers; the minute check revisits a long outage after startup or an automation reload. The 10-minute condition filters short dropouts, and the shared notification ID keeps repeated checks from stacking notices.
When the entity has been continuously unknown or unavailable for 10 minutes, the next minute check creates the notification. A change from unknown to unavailable starts the 10-minute check again. When the state is neither of those, a state change triggers dismissal; the next minute check provides another opportunity to clear it.
The same notification ID is reused, so checks replace the existing notice instead of accumulating copies. If someone dismisses it while the entity remains unavailable, the next check can create it again. Updates to a notification can themselves trigger other automations, so do not treat each update as a new outage.
After a restart, Home Assistant may count the entity’s state duration from startup, so the notice can take another 10–11 minutes. An automation reload or a brief outage can also change when you see it. Home Assistant documents the state condition and duration, time pattern trigger, and notification ID behavior.
3. Test without disconnecting a device
I checked the YAML and walked through the decisions offline. I haven’t run this exact automation in Home Assistant or tested it with a physical sensor, so try it on your own installation before relying on it:
- Create a test Dropdown helper under Settings → Devices & services → Helpers, with options
ready,unavailable, andunknown. Set it toreadyand note its entity ID, for exampleinput_select.availability_test. - Temporarily use that helper ID in all four places in the automation. Save, then select
unavailableon the helper. Before 10 minutes there should be no new notice; after 10–11 minutes check Notifications for “Important sensor needs attention.” - Keep it unavailable for another two checks: there should still be one notice with that ID. Select
ready; the notice should disappear. Repeat withunknown. - For restart behavior, leave the test helper unavailable, restart Home Assistant at a convenient time, and allow another 10–11 minutes. Confirm the notice appears again. Then set it to ready, return the automation to the real entity ID, and delete the test helper if no longer needed.
For a shorter trial, temporarily change 00:10:00 to 00:01:00; restore 10 minutes before monitoring a real device. Do not use the automation’s Run action as the only test: it bypasses normal trigger timing.
Optional: send the notice to your phone
You can keep the dashboard notice and add a separate automation to forward it when it is first created. Install and sign in to the Home Assistant Companion app on your phone and allow notifications. In Home Assistant, go to Settings → Automations & scenes → Automations → Create automation → Create new automation, then choose Edit in YAML and paste:
|
1 2 3 4 5 6 7 8 9 10 11 12 13 |
alias: Send sensor availability notice to phone mode: single triggers: - trigger: persistent_notification notification_id: important_sensor_offline update_type: - added actions: - action: notify.mobile_app_your_phone data: title: Important sensor needs attention message: Check the sensor availability notice in Home Assistant. |
Replace notify.mobile_app_your_phone with the phone’s actual notification action, which you can find under Developer Tools → Actions by searching for notify.mobile_app_. Keep the notification ID the same as in the monitoring automation. Save and enable both automations, then use the test helper above to confirm the phone receives a message when the dashboard notice first appears.
The added trigger ignores the monitor’s minute-by-minute updates to an existing notice. If you manually dismiss the notice while the sensor is still unavailable, the monitor can create it again and send another push. A notice already present when the forwarding automation starts does not cause a new push; Home Assistant or phone connectivity and notification permissions also affect delivery. See the persistent notification trigger documentation.
Watch more than one sensor
Duplicate the monitoring automation for each additional sensor, replace that sensor’s entity ID in all four places, and give each copy its own notification ID in both actions. For phone forwarding, duplicate the optional automation too and match its trigger to the new ID. Each sensor then has a separate notice.
Troubleshooting and removal
- No notice: Confirm the exact ID and current state in Developer Tools → States; ensure the entity has stayed in the same bad state long enough. Check that the automation is enabled and inspect its trace and Settings → System → Logs.
- Too many notices: Use the same ID in create and dismiss. For another monitored entity, duplicate the automation and give the copy a different ID in both places.
- Notice remains: Check the entity’s current state and the automation trace. A recovered value can still be stale; this monitor checks availability, not freshness or accuracy.
- Remove it: Disable or delete the automation and dismiss its notice in Home Assistant’s Notifications panel. Removing this monitor does not alter the device or integration.
Readers have raised the related problem of devices becoming unresponsive. For more on restart behavior, see Home Assistant’s automation troubleshooting guide. For another restart-aware example, see Restart-Safe Timed Switch.